

How to Sterilise Your Melony Pump: The Best Methods for Clean, Safe Pump Parts
Sterilising your Melony breast pump is an important step to ensure it’s hygienic and safe for your little one, especially after the first use. There are several methods you can use, depending on what you have available and your preferences.
Please note: The Melony Motor Hub should not come into contact with liquid at any time. To clean your Melony Motor, simply wipe with down with a lightly damp cloth.
Read on to learn about the main ways to sterilise your Melony wearable breast pump parts.
1. Boiling Water
Boiling water is a simple and effective method for sterilising your pump parts. Here's how you can do it:
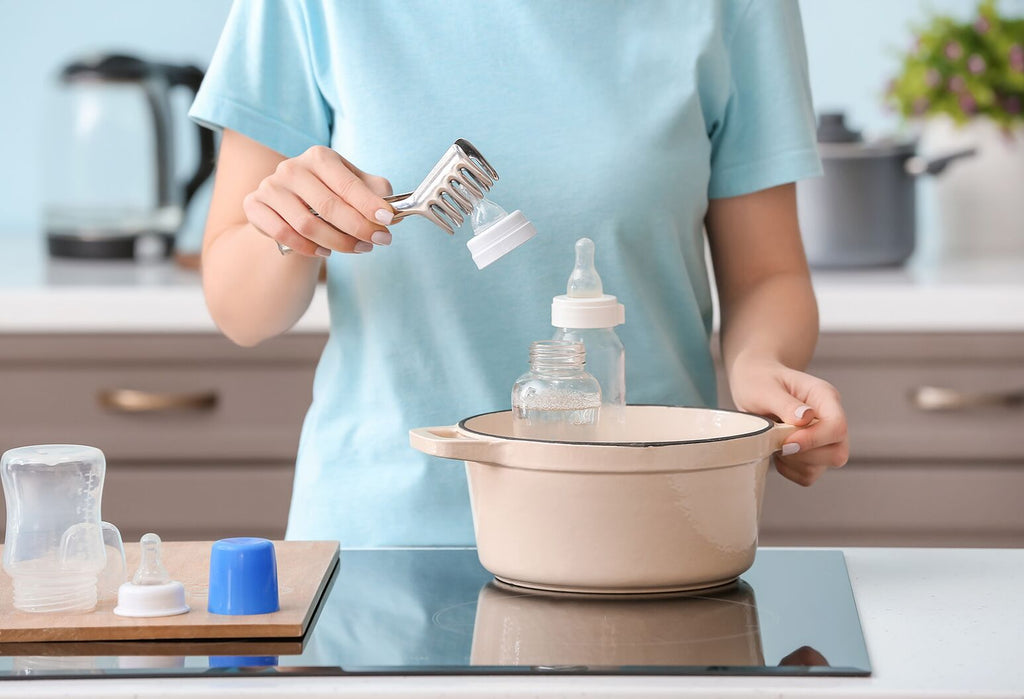
- Step 1: Bring a pot of water to a boil.
- Step 2: Carefully place your Melony pump parts (flanges, valves, connectors, and any other detachable parts) into the boiling water.
- Step 3: Let them boil for 5 minutes to ensure proper sterilisation.
- Step 4: Remove the parts using tongs or a slotted spoon and place them on a clean, dry towel to air dry.
Pros: No need for additional equipment—just water and a pot.
Cons: It can take some time, and you’ll need to be cautious to avoid burns or damaging small pump parts.
2. Steam Steriliser
A steam steriliser (also known as an electric steam steriliser) is a convenient, quick way to sterilise your pump parts. This method uses high heat and steam to kill germs and bacteria.
- Step 1: Place your Melony pump parts into the steriliser’s tray, following the manufacturer's guidelines (making sure you don't overload it).
- Step 2: Add the required amount of water into the steriliser’s base.
- Step 3: Turn on the steam steriliser. Most devices will automatically turn off when the cycle is complete (usually around 5-10 minutes).
- Step 4: Once the cycle is complete, carefully remove the parts, let them cool, and allow them to air dry.
Pros: Quick, efficient, and easy to use. Most models are compact and convenient for everyday use.
Cons: You need to buy the steriliser (though they’re generally affordable).
3. Cold Water Sterilisation (Sterilising Solution)
Cold water sterilisation involves soaking your pump parts in a sterilising solution, which is typically a chemical agent designed to kill germs.
- Step 1: Prepare the sterilising solution according to the instructions on the packaging (usually, it involves mixing the solution with water).
- Step 2: Submerge your Melony pump parts in the solution for the recommended amount of time (usually around 30 minutes).
- Step 3: After soaking, rinse the parts thoroughly with clean, cold water to remove any chemical residue.
- Step 4: Allow the parts to air dry.
Pros: Convenient if you don’t have access to boiling water or a microwave. Great for sterilising multiple items at once.
Cons: Requires buying the sterilising solution, and you need to ensure the solution is safe for use with baby items. Check with the steralising solution manufacturer's guidelines prior to use.
4. Dishwasher (with Sterilising Setting)
If you have a dishwasher with a sterilising or sanitising setting, you can use it to sterilise your Melony pump parts. This is a convenient option if you’re cleaning multiple items, such as bottles and breast pump parts, at once.
- Step 1: Place your pump parts on the top rack of your dishwasher, ensuring they’re not too crowded, so the hot water can reach all areas.
- Step 2: Run the dishwasher on the sterilising/sanitising cycle, which uses higher temperatures than the regular wash cycle (usually around 70°C/160°F).
- Step 3: Once the cycle is finished, remove the parts and let them air dry.
Pros: Convenient for busy mums who need to clean and sterilise multiple items at once.
Cons: Not all dishwashers have a sterilising cycle, and it may not be as thorough as other sterilising methods.
5. UV Steriliser
UV sterilisation is a modern and chemical-free method that uses ultraviolet light to kill bacteria and viruses. It’s an excellent option for mums who prefer a no-heat, no-chemical approach to sterilisation. Below is a general guide, you should always read the instructions specific to your individual steralising machine.
- Step 1: Place your Melony pump parts into the UV steriliser (typically a compact box or device that can fit your parts).
- Step 2: Close the lid of the steriliser and turn it on. The UV light will automatically begin the sterilisation process.
- Step 3: Most UV sterilisers complete the cycle in about 5-10 minutes, at which point the device will turn off or signal when done.
- Step 4: Once the cycle is finished, remove your sterilised pump parts. There’s no need for rinsing, as no chemicals are involved.
Pros: Quick, effective, and chemical-free. The process is gentle on your pump parts and ideal for frequent use.
Cons: UV sterilisers can be on the pricier side, but they’re a worthwhile investment for many families.
Important Tips for Sterilising Your Melony Pump Parts:
- Avoid High Heat: While boiling and steaming are effective, be cautious of overheating small parts, as excessive heat can degrade silicone or plastic over time. Always follow manufacturer guidelines.
- Dry Thoroughly: After sterilisation, always allow your pump parts to air dry completely on a clean towel or drying rack to prevent bacteria growth.
- Check Compatibility: Make sure the sterilisation method you choose is suitable for your Melony pump parts. Refer to your product manual for any specific cleaning or sterilising instructions.
Final Thoughts:
Sterilising your Melony wearable breast pump parts is a crucial part of maintaining a hygienic pumping routine. The method you choose depends on what’s most convenient for you. Whether you prefer the simplicity of boiling water, the speed of a steam steriliser, or the portability of steriliser bags, the goal is to keep your pump clean, safe, and ready for each session.
Leave a comment: